Core
1. The IoC Container
这一章主要讲述 Spring 的 IoC 容器,也就是 Inversion of Control container。
1.1. Introduction to the Spring IoC Container and Beans
本章涵盖了控制反转(IoC)原理的 Spring Framework 实现。IoC 也被称为依赖注入(DI)。依赖注入是这样一个过程,对象定义它们的依赖仅通过构造器参数,工厂方法参数,在对象实例构造完毕或者从工厂方法返回之后设置属性。然后,容器在创建 bean 时注入这些依赖。这个过程通过使用类的直接构造或者例如服务定位器模式的机制,从根本上反转(因此得名控制反转)了 bean 本身控制其依赖的初始化或者定位。
作者的话 IoC 是 Inversion of Control 的缩写;DI 是 Dependency Injection 的缩写
org.springframework.beans 和 org.springframework.context 是 Spring IoC 容器的基础包。BeanFactory 接口提供了管理任意类型对象的高级配置机制。ApplicationContext 是 BeanFactory 的子接口,添加了:
- 与 Spring AOP 功能更容易集成
- 消息资源处理(用于国际化)
- 事件发布
- 应用程序层特定上下文,例如用于 Web 应用程序中的
WebApplicationContext
简而言之,BeanFactory 提供了配置框架和基础功能,并且 ApplicationContext 添加了更多企业特定的功能。ApplicationContext 是 BeanFactory 的完整超集,仅仅用于本章 Spring IoC 容器的描述。有关使用 BeanFactory 而不是 ApplicationContext 的更多信息,参见 The BeanFactory
官网中,主要描述的也是
ApplicationContext。
在 Spring 中,构成应用骨架并由 Spring IoC 容器管理的对象称之为 bean。bean 是由 Spring IoC 容器实例化,组装和管理的对象。一个 bean 只是你应用程序中的众多对象之一。bean 以及其中的依赖项反映在供容器使用的配置元数据中。
1.2. Container Overview
org.springframework.context.ApplicationContext 代表 Spring IoC 容器,负责实例化、配置、组装 bean。通过读取配置元数据,容器获取那些需要实例化、配置、组装的对象的说明。配置元数据表现为 XML,Java 注解,Java 代码。它让你表达出组成你应用的对象,以及这些对象之间丰富的相互依赖性。
Spring 提供了一些 ApplicationContext 接口的实现。在独立应用程序中,通常创建 ClassPathXmlApplicationContext 或者 FileSystemXmlApplicationContext 实例。虽然 XML 一直是一种定义元数据的传统格式,但可以通过提供少量 XML 配置来声明启用其他元数据格式(Java 注解,Java 代码)的支持。它使你可以表达构成你应用程序的对象,以及这些对象之间丰富的相互依赖关系。
Spring 提供了 ApplicationContext 接口的几种实现。在独立应用程序中,通常创建一个 ClassPathXmlApplicationContext 或者 FileSystemXmlApplicationContext。虽然 XML 是定义配置元数据的传统格式,但是你可以通过提供少量的 XML 配置来声明开启对于这些传统元数据格式的支持,指示容器使用 Java 配置或者代码作为元数据格式。
在大多数应用程序方案中,无需明确的用户代码即可实例化一个或多个 Spring IoC 容器的实例。例如,在 Web 应用程序方案中,应用程序的 web.xml 文件中的样例 web 描述符 XML 简单八行就足够了。如果你使用 Spring Tools for Eclipse,你可以轻松地点几下鼠标或者敲键盘来创建此样板配置。
下图展示了 Spring 工作方式的高级视图。你的应用程序类与配置元数据结合起来,以便于在 ApplicationContext 创建并初始化之后,你可以拥有一个完全配置化的可执行的系统或应用程序。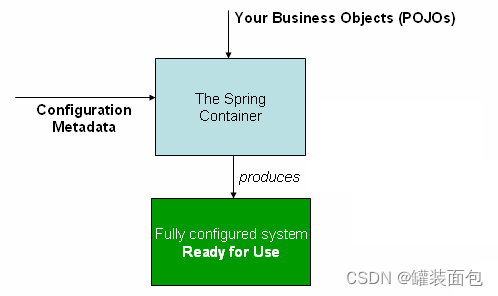
1.2.1. Configuration Metadata
如前面图所示,Spring IoC 容器消耗某种形式的配置元数据。配置元数据表现出你如何告诉 Spring 容器去实例化,配置,组装你应用程序中的对象。
- 组装可以认为是一种依赖注入。
传统上,配置元数据以简单而直观的 XML 格式提供,这是本章用于传达 Spring IoC 容器关键概念和特色的大多数方式。
基于 XML 的元数据并不是唯一的配置元数据格式。Spring IoC 容器本身与配置元数据实际编写的格式完全分离。如今,许多开发人员选择为他们的 Spring 应用使用基础 Java 的配置
有关与 Spring 容器一起使用的其他形式的元数据信息,参见:
- Annotation-based configuration: Spring 2.5 引入了基于注解的配置元数据支持
- Java-based configuration: 从 Spring 3.0 开始,Spring JavaConfig 项目提供的许多功能称为 Core Spring Framework 的一部分。因此,你可以使用 Java 而不是 XML 文件来定义你应用程序类之外的 bean。要使用这些新功能,见
@Configuration,@Bean,@Import,以及@DependsOn注解
Spring 配置包含至少一个,且通常不止一个容器必须管理的 bean 定义。基于 XML 的配置元数据将这些 bean 以 <bean/> 元素配置在顶级 <beans/> 元素中。Java 配置通常使用 @Configuration 类中的 @Bean 注解的方法。
以下示例展示了基于 XML 的配置元数据的基本结构:
1 |
|
id 属性是标识单个 bean 定义的字符串class 属性定义了 bean 的类型,并且使用完全限定类名。
1.2.2. Instantiating a Container
提供给 ApplicationContext 构造器的一个或多个位置路径是资源字符串,它使得容器能够从各种外部资源加载配置元数据,例如本地文件系统,Java CLASSPATH 等。
1 | ApplicationContext context = new ClassPathXmlApplicationContext("services.xml", "daos.xml"); |
Composing XML-based Configuration Metadata
让 bean 定义涵盖多个 XML 文件可能很有用。通常,每个单独的 XML 配置文件代表你的架构中的一个逻辑层或者模块。
你可以使用 ApplicationContext 构造器从所有这些 XML 片段中加载 bean 定义。该构造器接收多个 Resource 路径,如前一节所示。另外,请使用一个或多个 <import/> 元素从另一个(些)文件中加载 bean 定义。以下示例显示了如何做:
1 | <beans> |
在前面的例子中,外部 bean 定义是从这三个文件加载的:services.xml,messageSource.xml 以及 themeSource.xml。所有路径均相对于执行 import 的定义文件,因此 services.xml 必须执行 import 的文件在相同的目录或者类路径位置,而 messageSource.xml 和 themesource.xml 必须位于 import 文件位置下的 resources 位置中。如你所见,前导的斜杠被忽略了。但是,鉴于这些路径是相对的,最好不要使用斜杠。依据 Spring Schema,所导入的文件内容,包括顶级 <beans/> 元素,必须是有效的 XML bean 定义。
使用一个 “../“ 相对路径引用父目录的文件是可以的,但是并不推荐。这样做会产生对当前应用程序之外的文件的依赖。特别地,这种引用对于
classpath:URL(例如,classpath:../services.xml)也不建议,其中运行时解析过程选择 “最近” 的类路径根,然后查看其父目录。类路径配置更改可能导致选择其他的错误的路径。
你可以始终使用完全限定资源地址,而不是相对路径:例如,file:C:/config/services.xml或者classpath:/config/services.xml。但是,请注意,你将应用程序的配置耦合到特定的绝对路径。通常,最好对这种绝对路径持有一个间接取值 —— 例如,通过在运行时根据 JVM 系统属性解析的占位符 “${…}”
命名空间本身提供了 import 指令功能。除了普通 bean 定义之外,还可以在 Spring 提供的 XML 命名空间的选择中获得更多配置功能 —— 例如,context 和 util 命名空间。
The Groovy Bean Definition DSL
先省略
1.2.3. Using the Container
ApplicationContext 是一个高级工厂接口,能够维护各种各样 bean 及其依赖的注册表 。通过使用 T getBean(String name, Class<T> requiredType) 方法,你可以检索 你的 bean 实例。
ApplicationContext 使你可以读取 bean 定义并访问它们,如以下示例所示:
1 | // create and configure beans |
最灵活的变体形式是 GenericApplicationContext 组合 Reader 委托,例如:
1 | GenericApplicationContext context = new GenericApplicationContext(); |
作者的话 这种方式避免配置加载与 ApplicationContext 耦合
然后,你可以使用 getBean 来检索 bean 实例。ApplicationContext 接口还有一些其他的方法用于检索 bean,但是理想情况下,你的应用程序代码绝不应该使用它们。实际上,你的应用程序代码一点都不应该调用 getBean() 方法,因此一点都不依赖于 Spring API。例如,Spring 和 Web 框架的集成,通过元数据声明对 bean 的依赖,进而通过 Web 框架来获取 bean。
1.3. Bean Overview
Spring IoC 容器管理一个或多个 bean。这些 bean 是用你提供给容器的配置元数据所创建的(例如,以 XML <bean/> 定义形式)。
在容器之中,这些 Bean Definition 都会以 BeanDefinition 对象形式表现,其中包含(除其他信息)以下元数据:
- 完全限定类名,实际上也就是需要实例化的类
- bean 行为配置元素,指示 bean 在容器的行为,例如:scope,生命周期回调 initMethodName、destroyMethodName 等
- 依赖项(DependsOn)。
- 设置在新建对象的其他设置(
PropertyValues)。比如,池的大小, 连接的数量。
该元数据转化为构成每个 Bean Definition 的一组属性。下表描述了这些属性:
| Property | Explained in… |
|---|---|
| Class | Instantiating Beans |
| Name | Naming Beans |
| Scope | Bean Scopes |
| Constructor arguments | Dependency Injection |
| Properties | Dependency Injection |
| Autowiring mode | Autowiring Collaborators |
| Lazy initialization mode | Lazy-initialized Beans |
| Initialization method | Initialization Callbacks |
| Destruction method | Destruction Callbacks |
1.3.1. Naming Beans
每个 Bean 可以有一个或多个标识符。这些标识符必须在托管 Bean 的容器中是唯一的。通常,一个 Bean 只有一个标识符。但是,如果需要多个,其余视为别名。
在基于 XML 的配置元数据,你可以使用 id 属性,name 属性,或者两个一起来指定 bean 的标识符。id 属性允许你指定一个标识。按照约定,这些名字是字母或数字组合,例如:myBean, someService 等。
如果你想引入其他别名,你也可以指定 name 属性,使用 , 或者 ; 或者空格进行分割。
在 Spring 3.1 之前
id属性被定义为xsd:ID类型,可能受制于一定的字符。Spring 3.1 之后,它被定义为xsd:string类型。注意,尽管不再由 XML 解析器强制执行 beanid唯一性,但仍然由容器强制执行。
你不必为 bean 即提供 id 又提供 name。如果你有其中一个没有明确提供,容器会生成一个唯一的名字。但是,如果你想使用名称引用 bean,通过 ref 元素,或者服务定位器风格查找,你必须提供一个 name。
Bean Naming Conventions 该约定是,当命名 Bean 时,使用用于实例字段名称的标准 Java 约定。即,Bean 的名字以小写字母开头,并从那里开始以驼峰格式。此类名称的示例包括 `accountManager`,`accountService`,`userDao`,`loginController` 等。
Aliasing a Bean outside the Bean Definition
在一个 bean 定义本身中,你可以通过 id 属性指定最多 1 个名称,以及在 name 属性中任意数量的其他名称,为 bean 提供不止一个名称。这些名称可以等效的 bean 别名,并且对于某些场景很有用,例如,让应用程序中的每个组件通过使用特定于该组件本身的 bean name 来引用通用的依赖。
如果你使用 Java 配置,可以使用
@Bean注解提供别名。
1.3.2. Instantiating Beans
Bean Definition 本质上可以认为是创建一个或多个对象的配方。当需要时,容器会查找有名 bean 的配方,并使用该 Bean Definition 封装的配置元数据来创建(或者是获取)一个实际的对象。
如果你使用的是基于 XML 配置元数据,指定 <bean/> 元素的 class 属性作为对象的类型。class 属性(BeanDefinition 实例中的 Class 属性)通常是必需的。
Instantiation with a Constructor
当你通过构造器方式创建 bean 时,所有一般的类都可以为 Spring 所用,并与 Spring 兼容。也就是说,开发的类无需实现特定的接口或者以特定方式进行编码。简单地指定 bean 的 class 就足够了。但是,根据你用于该特定 bean 的 IoC 类型,你可能需要一个默认(空)构造器。
Spring IoC 容器几乎可以管理你想要管理的任何类。它不仅仅局限于管理真正的 Java Bean。大多数 Spring 用户更愿意在容器中使用实际的 Java Bean,具有一个默认(无参)构造器,以及适当的属性 Setter 和 Getter。你也可以在容器中有更多特别的非 bean 风格的类。例如,如果你需要使用绝对不符合 Java Bean 规范的旧连接池,Spring 也可以管理它。
使用基于 XML 的配置元数据,你可以按照如下方式指定 bean 的 class:
1 | <bean id="exampleBean" class="examples.ExampleBean"/> |
有关向构造函数提供参数的机制的详细信息(如果需要),并在对象构造后设置对象实例属性,请参见 Injecting Dependencies。
Instantiation with a Static Factory Method
使用静态工厂方法创建 bean 时,class 属性指定静态工厂方法的类,factory-method 属性指定静态方法名。主要用于遗留代码中的静态工厂方法:
1 | <bean id="clientService" |
Instantiation by Using an Instance Factory Method
实例工厂创建 bean 方法
1 | <!-- the factory bean, which contains a method called createInstance() --> |
一个工厂方法可以包含多个工厂方法。
Determining a Bean’s Runtime Type
1.4. Dependencies
典型的企业应用程序并不会只包含一个对象(就是 Spring 里的 Bean)。即使是最简单的应用,也会有一些对象共同协作,以一个连贯的应用呈现给终端用户他们所看到的东西。下一节说明你如何从定义许多单独的 Bean Definition 到一个完整实现的应用程序,其中对象相互合作达到目的。
1.4.1. Dependency Injection
依赖注入,对象通过构造函数参数、工厂方法的参数,或者在对象构造完毕之后设置到对象实例上的属性,或者工厂方法的返回值。
依赖注入存在两种主要的变体:
- 基于构造函数的依赖注入
- 基于 Setter 的依赖注入
Constructor-based Dependency Injection
基于构造函数的依赖注入是通过容器调用具有多个参数的构造函数来完成,每个参数代表一个依赖项。
Constructor Argument Resolution
构造函数参数解析通过参数类型匹配。如果 bean 定义的构造函数参数中不存在潜在的歧义,那么在 bean 定义中定义的构造函数参数的顺序就是当 bean 实例化时提供给构造器的参数的顺序。
Constructor argument type matching
如果使用 type 属性显式指定构造函数参数类型,则容器可以使用简单类型的类型匹配。
1 | <bean id="exampleBean" class="examples.ExampleBean"> |
Constructor argument index
解决构造函数参数歧义:可以通过 index 属性指定构造函数参数的索引(从 0 开始)。
1 | <bean id="exampleBean" class="examples.ExampleBean"> |
Constructor argument name
可以使用 name 属性消除构造器参数歧义。
1 | <bean id="exampleBean" class="examples.ExampleBean"> |
类似 MyBats 的
@Param,你需要将启用代码的 debug 编译,否则 Spring 无法找到参数名。
如果不希望使用 debug 编译,则使用 @ConstructorProperties 指定构造器参数名。
1 |
|
Setter-based Dependency Injection
理论上来说,基于 Setter 的依赖注入是容器在调用无参构造函数或者无参静态工厂方法实例化 bean 之后,再调用 bean 的 setter 方法完成。
ApplicationContext 对于它管理的 bean,支持基于构造器的依赖注入,也支持基于 setter 的依赖注入。它还支持,在已经通过构造器注入了一些依赖之后,继续用 setter 注入依赖。
可以用 BeanDefinition 的形式配置依赖项,将其与 PropertyEditior 实例结合使用以将属性从一种格式转换为另一种格式。但是,一般不这样使用编程方式工作,而是用 XML 的 bean 定义,注解,或者 @Configuration + @Bean 方式。然后这些源转换成 BeanDefinition 的实例,用于加载 Spring IoC 容器。
Dependency Resolution Process
容器执行 Bean 依赖解析如下:
- 创建
ApplicationContext并使用描述所有 Bean 的配置元数据初始化。配置元数据可以以 XML,Java 代码,或者注解方式指定。 - 对于每个 Bean,它的依赖项以属性,构造器参数,或者静态工厂方法(如果你使用它而不是普通构造器)参数的形式表示。实际创建 Bean 时,这些依赖项将提供给 Bean。
- 每个属性或者构造器参数是要设置的值的实际定义,或者是对容器中另一个 Bean 的引用
- 每个属性或者构造器参数从指定格式转换为该属性或者构造器参数的实际类型。默认地,Spring 可以将字符串格式转换为所有内置类型,如
int,long,String,boolean等。
1.4.2. Dependencies and Configuration in Detail
你可以定义 bean 属性,构造器参数作为引用其他被管理的 bean,或者作为内联值。Spring 的基于 XML 配置元数据支持在 <property/> 以及 <constructor-arg/> 之中的子元素类型。
Straight Values (Primitives, Strings, and so on)
<property/> 元素的属性 value 将一个属性或者构造器参数指定为一个人可读的表现形式。Spring 的 conversion service 用于将这些值从 String 转换为属性或者参数的实际类型。以下示例展示了各种值的设置:
1 | <bean id="myDataSource" class="org.apache.commons.dbcp.BasicDataSource" destroy-method="close"> |
你还可以配置 java.util.Properties 示例,如下:
1 | <bean id="mappings" |
The idref element
ideref 元素是一种错误校验方式,将容器中另一个 bean 的 id 传递给 <constructor-arg/> 或者 <property/> 元素。
1 | <bean id="theTargetBean" class="..."/> |
上面的 bean 定义片段等价于下面的:
1 | <bean id="theTargetBean" class="..." /> |
第一个形式比第二个更好,因为使用 idref 标记允许容器在部署期间验证所引用的有名 bean 是否实际存在。
1.4.3. Using depends-on
如果一个 Bean 是另一个 Bean 的依赖项,那通常意味着该 Bean 被设置为另一个 Bean 的属性。通常,你可以在基于 XML 的配置元数据中使用 <ref/> 元素来完成此操作。但是,有时候 Bean 之间的依赖不太直接。一个例子是,需要触发类中的静态初始化器,例如数据库驱动程序注册。depends-on 属性可以显式强制在使用该元素(depends-on)的 Bean 初始化之前,初始化一个或多个 bean。下面的示例使用 depends-on 属性来表达对单个 bean 的依赖性:
1 | <bean id="beanOne" class="ExampleBean" depends-on="manager"/> |
要表达对多个 bean 的依赖性,请提供 Bean 名称的列表作为依赖性属性的值(逗号,空格,分号是有效的分隔符):
1 | <bean id="beanOne" class="ExampleBean" depends-on="manager,accountDao"> |
1.4.4. Lazy-initialized Beans
默认地,ApplicationContext 实现类会迅速创建并配置所有的单例 bean,这作为初始化过程的一部分。通常,这种预启动是可取的,因为可以立即发现配置或者环境中的错误,而不是几个小时,甚至几天之后才发现。当这种行为不可取时,你可以通过将 Bean Definition 标记为懒初始化来防止对单例 bean 的预实例化。懒初始化 bean 告诉 IoC 容器首次请求时要创建一个 bean 实例,而不是在启动时创建一个 bean 实例。
在 XML 中,此行为由 <bean/> 元素上的 lazy-init 属性控制,如下示例所示:
1 | <bean id="lazy" class="com.something.ExpensiveToCreateBean" lazy-init="true"/> |
当前面的配置被 ApplicationContext 消费时,在 ApplicationContext 启动时,lazy bean 不会迅速地预启动,然而 not.lazy bean 会迅速地预实例化。
但是,当一个懒初始化 bean 是一个非懒初始化的单例 bean 的依赖时,ApplicationContext 在启动时会创建初始化 bean,因为它必须满足单例的依赖性。懒初始化 bean 被注入到别的非懒初始化的单例 bean 中。
你还可以通过使用 <beans/> 元素上的 default-lazy-init 属性来控制容器级别的懒初始化,如以下示例所示:
1 | <beans default-lazy-init="true"> |
1.4.5. Autowiring Collaborators
Spring 容器可以自动绑定协作 Bean 之间的关系。你可以让 Spring 自动地通过审查 ApplicationContext 的内容为你的 Bean 解析协作者的话(其他 Bean)。自动绑定有如下优势:
- 自动绑定可以大大减少指定属性或者构造器参数的需求。
- 自动绑定可以随着对象的进化更新配置。
Limitations and Disadvantages of Autowiring
考虑自动绑定的局限性和劣势:
- 在
property和constructor-arg设置上的显式依赖总是会覆盖自动绑定。你不能自动绑定简单属性,例如原生类型,Strings,以及Classes。这种限制是设计如此的。 - 自动绑定不如显式绑定精确。虽然,如前面表格所述,Spring 在可能有产生无法预测结果的歧义情况下,小心地避免猜测。你由 Spring 管理的对象之间的关系不再明确记录。
- 那些能够从 Spring 容器中生成文档的工具可能无法获得自动绑定信息
- 可能容器中多个 Bean Definition 都可以匹配待绑定的 Setter 方法或者构造器参数指定的类型。对于数字,集合,或者
Map实例,这未必是个问题。但是,对于期望单个值得依赖,这种歧义无法解决。如果没有唯一得 Bean Definition,则会抛出异常。1.4.6. Method Injection
在大多数应用场景中,多数的 bean 都是单例。当一个单例 bean 需要与另一个单例 bean 协作,或者一个非单例 bean 需要与另一个非单例 bean 协作,你通常会定义其中一个 bean 为另一个的属性来处理依赖关系。当 bean 的生命周期不同时,就会出现问题。假设单例 bean A 需要使用非单例(prototype)bean B,也许是在 A 的每个方法调用上。容器只会创建单例 bean A 一次,因此,只有一个机会可以设置属性 。不可能每次需要时容器都为 bean A 提供一个新的 bean B 实例。
作者的话 官方的意思应该是 bean A 的方法调用都需要一个全新的 bean B,而不是复用同一个,但是在遵循控制反转的规则下,又无法每次需要时从容器中得到一个全新的 bean B。
解决方案是放弃一些控制反转。你可以让 bean A 实现 ApplicationContextAware 接口来感知容器,并且,每当 bean A 需要的时候,通过调用容器的 getBean("B") 请求(通常是新的)一个 bean B 实例。
1.5. Bean Scopes
Spring Framework 支持 6 个范围,其中四个仅在使用 web-aware ApplicationContext
| Scope | Description |
|---|---|
| singleton | (默认值)对于每个 Spring IoC 容器,将单个 Bean Definition 范围示为单个对象实例 |
| prototype | 将单个 Bean Definition 范围示为任意数量的对象实例 |
1.6. Customizing the Nature of a Bean
Spring Framework 提供了许多可用的接口来自定义 bean 的性质。本节将它们分组为如下:
- Lifecycle Callbacks
ApplicationContextAwareandBeanNameAware- Other
AwareInterfaces
1.6.1. Lifecycle Callbacks
要与 Bean 生命周期的容器管理交互,你可以实现 Spring 的 InitializingBean 和 DisposableBean 接口。该容器为前者调用 afterPropertiesSet(),为后者调用调用 destroy(),这使得在 bean 的初始化和销毁时执行某些操作。
作者的话
InitializingBean方法的调用是通过创建 bean 的过程中由AbstractAutowireCapableBeanFactory调用invokeInitMethods方法实现的,该方法除了调用接口实现的方法,还可以触发自定义 init 方法的调用
在内部,Spring Framework 使用 BeanPostProcessor 实现类来处理任何它能找到的回调接口,并调用适当的方法。如果你需要自定义功能或者其他 Spring 默认没有提供的生命周期行为,则可以自己实现一个 BeanPostProcessor。更多信息,参见 Container Extension Points。
作者的话 准确来说,是由
CommonAnnotationBeanPostProcessor来调用生命周期方法的,而CommonAnnotationBeanPostProcessor又是InitDestroyAnnotationBeanPostProcessor的子类,后者实现了调用逻辑。
除了初始化和销毁的回调外,被 Spring 管理的对象还可以实现 Lifecycle 接口,以便于这些对象能够参与由容器自己的生命周期驱动的启动和关闭过程。
Lifecycle 回调接口在本节中有描述。
减少与 Spring 的耦合,JSR-250 最佳实践:
@PostConstruct@PreDestroy
不想使用 JSR-250,可以考虑:
- init-method
- destroy-method
Spring 使用 BeanPostProcessor 实现来处理找到的任何回调接口并调用适当的方法。可以自定义功能。
Initialization Callbacks
org.springframework.beans.factory.InitializingBean 接口让 bean 可以在容器设置所有必要的属性之后执行初始化工作。InitializingBean 接口指定了一个方法:
1 | void afterPropertiesSet() throws Exception; |
我们建议你不要使用 InitializingBean 接口,因为它不必要地将代码耦合到 Spring。另外,我们建议使用 @PostConstruct 注解或者指定一个 POJO 初始化方法。对于基于 XML 的配置元数据,你可以使用 init-method 属性来指定一个返回值为 void,没有参数签名的方法。对于 Java 配置,你可以使用 @Bean 的 initMethod 属性。考虑如下示例:
作者的话 如果你没有指定返回值为 void 的无参方法,那么就会启动抛出异常。
作者的话 如果你对调用初始化回调方法顺序并没有严格的需求,那么你完全可以用
@PostConstruct注解来完成,从而忽视 init 方法或者InitializingBean接口。而且,@PostConstruct注解方法可以配置多个,init 方法或者InitializingBean只能指定一个。
1 | <bean id="exampleInitBean" class="examples.ExampleBean" init-method="init"/> |
1 | public class ExampleBean { |
上面的示例的效果几乎与下面示例效果完全相同:
1 | <bean id="exampleInitBean" class="examples.AnotherExampleBean"/> |
1 | public class AnotherExampleBean implements InitializingBean { |
但是,前面两个示例中的第一个不会将代码与 Spring 耦合。
Destruction Callbacks
实现 DisposableBean 接口可以让 bean 在容器销毁它时执行回调。
给 destroy-method 或者 default-destroy-method 赋予特殊值 (inferred) 会进行方法推断,如:java.io.Closeable,java.lang.AutoCloseable 的实现方法。
Default Initialization and Destroy Methods
在 <beans> 指定属性:
- default-init-method
- default-destroy-method
此属性可以被 <bean> 的属性 init-method 和 destroy-method 覆盖
Combining Lifecycle Mechanisms
为同一个 bean 配置多个生命周期机制,具有不同的初始化方法,调用如下:
- @PostConstruct 方法
- InitializingBean.afterPropertiesSet() 方法
- 自定义配置的 init() 方法
销毁方法类似:
- @PreDestroy
- DisposableBean.destroy()
- 自定义配置的 destroy()
Startup and Shutdown Callbacks
Lifecycle 接口为那些有自己生命周期需求的对象定义了必要的方法(例如启动或停止某些后台处理过程):
1 | public interface Lifecycle { |
任何被 Spring 管理的对象都可以实现 Lifecycle 接口。然后,当 ApplicationContext 本身接收启动和停止信号时,它会汇总定义在该上下文中的所有 Lifecycle 实现类的调用。它通过委托给 LifecycleProcessor 做到这一点,如下列表所示:
1 | public interface LifecycleProcessor extends Lifecycle { |
注意,LifecycleProcessor 本身就是 Lifecycle 接口的扩展。它还添加了两个其他的方法,用于响应上下文的刷新和关闭。
注意,常规的
org.springframework.context.Lifecycle接口明确的启动和停止通知的简单合同,并不意味着在上下文刷新事件内自动启动。要对特定 bean 的自动启动(包括启动阶段)进行细粒度的控制,考虑实现org.springframework.context.SmartLifecycle。
启动和关闭调用的顺序可能很重要。如果任何两个对象之间存在”依赖”关系,则依赖侧在其依赖之后启动,并且在其依赖之前停止。但是,有时候直接依赖性是未知的。你可能只知道某种类型的对象应该在其他类型对象之前开始。在这种情况下,SmartLifecycle 接口定义了另一个选项,即在父接口上定义的 getPhase() 方法。如下几列展示了 Phased 接口的定义:
1 | public interface Phased { |
以下几行展示了 SmartLifecycle 接口的定义:
1 | public interface SmartLifecycle extends Lifecycle, Phased { |
启动时,最低阶段的对象首先启动。停止时,遵循反向顺序。因此,实现 SmartLifecycle 及其 getPhase() 方法返回 Integer.MIN_VALUE 将是第一个启动,最后一个停止的对象。
Shutting Down the Spring IoC Container Gracefully in Non-Web Applications
本节仅适用于非 Web 应用。当关闭相关的 Web 应用时,Spring 基于 Web 的
ApplicationContext实现已经有了适当的代码,可以优雅地关闭 Spring IoC 容器。
1.6.2. ApplicationContextAware and BeanNameAware
当 ApplicationContextAware 创建一个实现了 org.springframework.context.ApplicationContextAware 接口的对象实例时,会提供一个 ApplicationContext 的引用给该实例。下面几行展示了 ApplicationContextAware 接口的定义:
1 | public interface ApplicationContextAware { |
因此,bean 可以通过 ApplicationContext 接口或者通过将引用转换到该接口的已知子类(例如 ConfigurableApplicationContext,其暴露了额外的功能),从而程序化地操纵创建它们的 ApplicationContext。一种用法是对其他 bean 的程序化检索。有时候这种功能很有用。但是,总的来说你应该避免它,因为它将代码耦合到 Spring,并且不遵循 IoC 风格,此时将合作者的话作为属性提供给 bean。ApplicationContext 的其他方法提供了对文件资源的访问,发布应用事件,以及访问 MessageSource。这些附加功能在 Additional Capabilities of the ApplicationContext 中进行了描述。
自动绑定时对获得 ApplicationContext 的引用的另一种替代方式。传统的 constructor 以及 byType 自动绑定模式可以分别为构造函数参数或者 setter 方法参数提供 ApplicationContext 类型的依赖。为了获得更多灵活性,包括自动绑定字段以及多参数方法的能力,请使用基于注解的自动绑定特性。如果你这样做了,并且字段,构造器,或者方法携带了@Autowired 注解,那么ApplicationContext 将自动绑定到一个字段,构造器参数,或者期望 ApplicationContext 类型的方法参数。更多信息,参见 Using @Autowired。
使用 @Autowired 获得 ApplicationContext
当 ApplicationContext 创建了一个实现 org.springframework.beans.factory.BeanNameAware 接口的类时,它会给该类提供定义在其关联对象定义中的名称引用。下面几行展示了 BeanNameAware 接口的定义:
1 | public interface BeanNameAware { |
在普通 bean 属性填充之后,但是在例如 InitializingBean,afterPropertiesSet,或者自定义的 init-method 初始化回调之前调用该回调。
作者的话 所以,顺序应该是填充属性(populate),Aware 回调,init 回调。
1.6.3. Other Aware Interfaces
除了 ApplicationContextAware 和 BeanNameAware(前面讨论过)之外,Spring 还提供了广泛的 Aware 回调接口,使得 bean 向容器指示它们需要一定的基础架构依赖。正如一般规则,名称表示依赖类型。下表总结了最重要的几个 Aware 接口:
| Name | Injected Dependency | Explained in… |
|---|---|---|
| ApplicationContextAware | ||
| ApplicationEventPublisherAware | ||
| BeanClassLoaderAware | ||
| BeanFactoryAware | ||
| BeanNameAware | ||
| BootstrapContextAware | ||
| LoadTimeWeaverAware | ||
| MessageSourceAware | ||
| NotificationPublisherAware | ||
| ResourceLoaderAware | ||
| ServletConfigAware | ||
| ServletContextAware |
1.7. Bean Definition Inheritance
Bean Definition 可以包含许多配置信息,包括构造器参数,属性值,特定于容器的信息,例如初始化方法,静态工厂方法名等。子 Bean Definition 从父 Definition 继承配置数据。子 Definition 可以覆盖一些值,或者根据需要添加其他值。使用父子 Bean Definition 可以节约大量键入。有效地,这是一种模板。
如果你以编程的方式使用 ApplicationContext 接口,那么子 Bean Definition 以 ChildBeanDefinition 类标表示。大多数用户在这一层不与它们合作。相反,它们在类中声明式配置 Bean Definition,例如 ClassPathXmlApplicationContext。当你使用基于 XML 的配置元数据时,你可以通过使用 parent 属性来指示子 Bean Definition,将父 bean 指定为该属性的值。下面的示例展示了怎么做:
1 | <bean id="inheritedTestBean" abstract="true" |
1.8. Container Extension Points
通常,应用程序开发者不必子类化 ApplicationContext 实现类。取而代之的是,可以通过插入特殊集成接口实现来扩展 Spring IoC 容器。接下来几节描述了这些集成接口。
1.8.1. Customizing Beans by Using a BeanPostProcessor
BeanPostProcessor 接口定义了一些回调方法,你可以实现它们来提供自己的实例化逻辑(或者覆盖容器默认的),依赖解析逻辑等。如果你要在 Spring 容器完成实例化,配置,初始化 bean 之后,实现一些自己的逻辑,则可以插入一个或多个自定义的 BeanPostProcessor 实现。
你可以配置多个 BeanPostProcessor 实例,并且通过设置 order 属性控制这些 BeanPostProcessor 实例执行顺序。你只有在 BeanPostProcessor 实现 Ordered 接口时才能设置此属性。如果你编写自己的 BeanPostProcessor,则也应该考虑实现 Ordered 接口。有关更多信息,请参阅 BeanPostProcessor 和 Ordered 接口的 javadoc。另请参见 programmatic registration of BeanPostProcessor instances.
如果要更改实际的 bean 实例,则需要使用 BeanPostProcessor。虽然,技术上可以通过 BeanFactoryPostProcessor 实现(如:
beanFactory.get()),但是这样会导致 bean 过早实例化,违反了标准的容器生命周期。而且,这会产生副作用,如:绕过 bean 的后置处理。
org.springframework.beans.factory.config.BeanPostProcessor 接口刚好由 2 个回调方法组成。当这样的类以 post-processor 注册到容器中时,post-processor 在容器初始化方法调用之前,且在任何 bean 初始化回调之后,都会从容器中获得回调。Post Processor 可以对 bean 实例进行任何操作,包括完全忽略回调。一个 Bean Post Processor 通常检查回调接口,或者可能包装带有代理的 bean。一些 Spring AOP 基础架构类以 Bean Post Processor 进行实现,以提供代理包装逻辑
ApplicationContext 自动检测实现了 BeanPostProcessor 接口的定义在配置元数据中的任何 bean。ApplicationContext 将这些 bean 注册为后置处理器,以便以后再 bean 创建时可被调用。Bean Post Processor 可以与其他任何 bean 以相同的方式部署到容器中。
请注意,当通过在 Configuration 类上使用 @Bean 工厂方法声明 BeanPostProcessor 时,工厂方法的返回类型应该时实现类本身,或者至少是 org.springframework.beans.factory.config.BeanPostProcessor 接口,清晰表明该 bean 的后置处理性质。否则,ApplicationContext 在完全创建它之前将无法通过类型自动检测到。由于需要尽早实例化 BeanPostProcessor 才能应用于上下文中其他 bean 的初始化,因此这种早期类型检测至关重要。
作者的话 如果你的
BeanPostProcessor不仅实现了BeanPostProcessor还实现了其他接口或者继承了其他类,那么 @Bean 返回类型必须使用BeanPostProcessor否则 Spring 无法识别到
具体的底层代码可以阅读 AbstractAutowireCapableBeanFactory#initializeBean(),其中在调用 invokeInitMethods() 方法的前后分别调用了 applyBeanPostProcessorsBeforeInitialization() 和 applyBeanPostProcessorsAfterInitialization()。
| 常见的 BeanPostProcessor | 描述 |
|---|---|
| CommonAnnotationBeanPostProcessor | 用于执行 @PostConstruct @PreDestroy 注解的方法 |
| AutowiredAnnotationBeanPostProcessor | 用于自动注入 @Autowired @Value @Inject |
Example: Hello World, BeanPostProcessor-style
Example: The AutowiredAnnotationBeanPostProcessor
使用回调接口或者注解,配合自定义的 BeanPostProcessor 实现是扩展 Spring IoC 容器的常见手段。一个例子是 Spring AutowiredAnnotationBeanPostProcessor —— 这是 BeanPostProcessor 的一个实现类,其与 Spring 分布和 @Autowired 注解字段,Setter 方法,以及任意配置方法一起
1.8.2. Customizing Configuration Metadata with a BeanFactoryPostProcessor
BeanFactoryPostProcessor 是一个扩展点。BeanFactoryPostProcessor 与 BeanPostProcessor 语义类似,但有一个主要区别:BeanFactoryPostProcessor 对 bean 配置元数据进行操作。Spring Ioc 容器允许 BeanFactoryPostProcessor 读取配置元数据,并且可以在实例化除了 BeanFactoryPostProcessor 任何 bean 之前修改这些配置元数据。
BeanDefinitionRegistryPostProcessor是BeanFactoryPostProcessor的子接口。
可以配置多个 BeanFactoryPostProcessor 实例,并通过 order 属性来控制这些实例的运行顺序。如果编写自己的 BeanFactoryPostProcessor,也应该考虑实现 Ordered 接口。
为了应用这些改变到容器中的配置元数据,当 bean factory 后置处理器声明在 ApplicationContext 中时,它会自动执行。Spring 包含了许多预定义的 bean factory 后置处理器,比如 PropertyOverrideConfigurer 以及 PropertySourcesPlaceholderConfigurer。
1.9. Annotation-based Container Configuration
配置 Spring 注解比 XML 更好吗? 引入基于注解的配置出现了一个问题,即这种方式是否比 XML 更好。简短的答案是:看情况。具体就是,每种方法都有其优点和缺点,通常,开发人员决定哪种测策略更适合他们。由于他们的定义方式,注解在声明的时候提供许多上下文,使得配置更短,更简洁。但是,XML 擅于在不触及源代码以及重新编译的情况下,将组件关联起来。一些开发者更喜欢让关联接近源代码,而另一个开发者人为注解类不再是 POJO,此外,配置变得分散且难以控制。
- Spring 2.0 引入
@Required强化需要的属性
基于注解得配置提供了 XML 设置的可替代方案,该方案依赖于字节码元数据来绑定组件而不是声明。无需使用 XML 去描述 Bean 的绑定,开发者只需将配置移动到组件类本身,在相关的类,方法,或者字段声明上面使用注解。如 Example: The AutowiredAnnotationBeanPostProcessor 所述,结合注解使用 BeanPostProcessor 是扩展 Spring IoC 容器的通用方式。
1.9.1. @Required
@Required 注解用于 bean 的 Setter 方法,如下示例:
1 | public class SimpleMovieLister { |
作者的话 该注解只能使用在方法上
该注解表示,受影响的 Bean 属性必须在配置期间填充属性,无论是通过 Bean Definition 中明确的属性值,还是自动绑定。如果受影响的属性并没有填充,则容器会抛出一个异常。这是考虑到尽早且明确的故障,以免以后 NullPointerException 实例或者此类的问题。我们依然建议你将断言放到 bean 类本身(例如,放入 init 方法)。这样做甚至可以当你在容器之外使用类时,也能强制需要的引用和值。
RequiredAnnotationBeanPostProcessor必须注册为一个 bean,以支持@Required注解
作者的话 Spring Boot 默认是不注册
RequiredAnnotationBeanPostProcessor的,因此需要手动导入,譬如使用@Import
@Required注解和RequiredAnnotationBeanPostProcessor在 Spring 框架 5.1 正式弃用,这是为了支持对必需的配置使用构造器注入(或者一个InitializingBean.afterPropertiesSet()自定义的实现,或者随着 Bean 属性 Setter 方法自定义的@PostConstruct方法。
1.9.2. Using @Autowired
在本节包含的示例中,你可以使用 JSR 330 的
@Inject注解代替 Spring 的@Autowired注解。有关更多详情,参见此处。
你可以将 @Autowired 注解应用在构造器上,如下实例所示:
1 | public class MovieRecommender { |
从 Spring Framework 4.3 开始,如果目标 Bean 仅定义了一个构造器,则不再需要在该构造器上使用
@Autowired注解。但是,如果有几个构造器可用,并且没有 primary 或者默认构造器,至少用@Autowired注解一个构造器,以便于指示容器用哪一个。
你也可以将 @Autowired 注解应用于传统的 Setter 方法,如下示例所示:
1 | public class SimpleMovieLister { |
你也可以将注解应用于具有任意名称和多个参数的方法,如下示例所示:
1 | public class MovieRecommender { |
你还可以将 @Autowird 应用在字段上,甚至混合构造器一起使用,如下示例所示:
1 | public class MovieRecommender { |
通过将 @Autowired 注解添加到字段或者期望数组类型的方法上,你可以指示 Spring 从 ApplicationContext 中提供所有特定类型的 Bean,如下示例所示:
1 | public class MovieRecommender { |
相同的也可以用在集合类型上,如下示例所示:
1 | public class MovieRecommender { |
甚至类型 Map 示例也可以自动绑定,只要期望的 Key 类型是 String。Map 的 value 包含所有期望类型的 Bean,kay 包含相关的 Bean 名称,如下示例所示:
1 | public class MovieRecommender { |
默认情况,当对于给定的注入点没有匹配的候选 Bean 可用时,自动绑定就会失败。在声明了数组,集合,或者 Map 情况下,期望至少有一个匹配的元素。
默认的行为是将注解的方法和字段视为必需的依赖。你可以如下示例所示,更改此行为,通过将其标记为非必需的(即,通过设置 @Autowired 属性 required 为 false),让框架跳过不满足的注入点:
1 | public class SimpleMovieLister { |
如果一个非必需的方法依赖(或者在多参数情况下,有一个依赖)不可获得,那么该方法根本不会调用。在这种情况下,非必需的字段将根本不会被填充,保持默认值。
另外,你可以通过 Java 8 的 java.util.Optional 表达特定以来的非必需特性,如下示例所示:
1 | public class SimpleMovieLister { |
@Autowired 用法:
(1) 构造函数。若 bean 只有一个构造函数,则可不必。
(2) setter 方法
(3) 任意的方法
(4) 字段
(5) 数组、Collection、Map
(6) java.util.Optional
(7) BeanFactory,ApplicationContext,Environment,ResourceLoader,ApplicationEventPublisher,MessageSource 这些接口以及它们的扩展接口
指定类型数组、集合的顺序
(1) org.springframework.core.Ordered
(2) @Order 或者 @Priority
@Autowired,@Inject、@Value、@Resource 会由 Spring 的 BeanPostProcessor 处理。因此,不能在自己的 BeanPostProcessor 或者 BeanFactoryPostProcessor 中使用这些注解(否则循环了)。
注入见:org.springframework.beans.factory.annotation.AutowiredAnnotationBeanPostProcessor#postProcessProperties
1.9.3. Fine-tuning Annotation-based Autowiring with @Primary
按照类型的自动绑定可能产生多个候选者,因此有必要使用更多的控制进行选择。其中一种方式就是使用 @Primary 注解。@Primary 注解表示,当多个 bean 候选者需要自动绑定到一个单值依赖上时,特定的 bean 应该给予优先权。如果多个候选者中存在一个主要的 bean,那么它将会自动绑定到值上。
BeanDefinition接口方法isPrimary()正是描述了该 bean 是否具有优先权。- 如果你注入了两个类型相同,且都标注了
@Primary的 bean,而且通过类型获取单个 bean,那么将会抛出异常。具体逻辑见:DefaultListableBeanFactory#determinePrimaryCandidate
作者的话 该注解完全可以忽视,一般并不希望自动绑定出现歧义,或者直接使用
@Resource进行准确绑定。
1.9.4. Fine-tuning Annotation-based Autowiring with Qualifiers
当你需要在选择过程上有更多控制时,可以使用 @Qualifier 注解。你可以将 qualifier 的值与特定参数绑定,缩小类型匹配的集合,以便于能选出特定的那个 bean。
可以用于:字段、方法参数
1 |
|
1 |
|
- 作为备用匹配,bean 的名称被当作默认的限定值。但是,即使你使用这个约定,通过名称引用一个 bean,@Autowired 本质上也是类型驱动注解,只是附带一个可选的语义限定符(在匹配类型的集合中缩小范围),并不能表示唯一一个 bean 的
id。- 好的限定符应该表达一个与 bean ID 无关的特定组件的特征。
Qualifier 也可以适用于类型集合,比如 Set<Object>,这意味着限定者并不是唯一的,而是一个筛选条件。
- 如果你希望通过名称进行注解驱动注入,但不想使用
@Autowired,即使这是可以在类型匹配的候选者中选择对应名称的 bean,你可以使用 JSR-250 注解@Resource,这是一个语义上定义为通过使用唯一名称标识特定组件的注解,与声明类型无关。
1.9.5. Using Generics as Autowiring Qualifiers
除了显式使用 @Qualifier 注解,你可以使用 Java 泛型作为隐式的限定。
1.9.6. Using CustomAutowireConfigurerl
1.9.7. Injection with @Resource
Spring 也支持 JSR-250 注解 @Resource,用于字段或者 bean 属性的 setter 方法。
@Resource 具有一个 name 属性。默认地,Spring 将该值当作被注入的 bean 的名字。
@Resource注解不支持 static 字段。
如果没有指定 name,默认的名称将会从字段名或者 setter 方法中解析出来。没有显式地指定名称,类似于 @Autowired,@Resource 将查找主要地类型匹配而不是特定 名称,并且解析熟知的 BeanFactory, ApplicationContext, ResourceLoader, ApplicationEvenetPublisher, MessageSource 接口。
1.9.8. Using @Value
@Value 典型的用法是注入外部的属性
使用位置:字段、方法参数
@Value("${catalog.name:defaultCatalog}"),defaultCatalog 为默认值,用冒号隔开@Value("${server.error.path:${error.path:/error}}"),嵌套使用
Spring 默认是宽松解析,如果要严格解析,配置 PropertySourcesPlaceholderConfigurer,Spring Boot 是默认配置的(见 PropertyPlaceholderAutoConfiguration)。
1.9.9. Using @PostConstruct and @PreDestroy
CommonAnnotationBeanPostProcessor 不仅能识别 @Resource 注解,还可以识别 JSR-250 生命周期注解:javax.annotation.PostConstruct 和 javax.annotation.PreDestroy。
在标准 JDK 6 到 JDK 8 中,
@Resource,@PostConstruct,@PreDestroy注解是其中的一部分。但是,整个javax.annotation包在 JDK 9 中与核心模块分开,并最终在 JDK 11 移除。如果需要,则应该通过 maven 中心获取javax.annotation-api组件,简单地添加到类路径中。
1.10. Classpath Scanning and Managed Components
通过隐式地类路径扫描找到候选组件。候选组件是那些与过滤器标准相匹配的类,并且会有一个相关的 bean 定义被注册到容器中。这会消除使用 XML 执行 bean 定义的需求。取而代之的,你可以使用注解,AspectJ 类型表达式,或者你自己自定义的过滤器原则来挑选出注册到容器中的 bean 定义。
1.10.1. @Component and Further Stereotype Annotations
@Repository 是那些具有仓库(也可以认为是 Data Access Object)作用的类的标记。
Spring 提供了更多注解:@Component, @Service, @Controller。@Component 对于任何 Spring 管理的组件来说,是一个通用注解。@Repository, @Service, @Controller 是 @Component 的特例。因此,你可以用 @Component 注解你的组件类,但是,通过用 @Repository, @Service, @Controller 注解,你的类可以更好地通过工具处理,或者与切面关联。
1.10.2. Using Meta-annotations and Composed Annotations
Spring 提供的许多注解可以作为你自己代码的元注解,以供其他注解使用。
你可以组合元注解创建组合型注解。例如,@RestController 注解就是 Spring MVC 框架中,由 @Controller 和 @ResponseBody 组合而成。
1.10.3. Automatically Detecting Classes and Registering Bean Definitions
Spring 可以自动检测刻板印象类,并注册相关的 BeanDefinition 实例到 ApplicationContext。例如,以下两个类有资格被自动检测到:
1 |
|
1 |
|
为了自动检测类并注册相关的 bean,需要将 @ComponentScan 添加到 @Configuraion 类上,其中,@ComponentScan 的 basePackages 属性是这些的共有父包。
- 你可以指定多个父包,以逗号(
,)或者分号(;)或者空格分隔。
如果你使用 XML,则可以以如下代码替代:
1 | <context:component-scan base-package="org.example"/> |
当你使用 <component-scan/> 元素时 ,AutowiredAnnotationBeanPostProcessor 和 CommonAnnotationBeanPostProcessor 两者会隐式地包含进来。
- 你可以通过包含
annotation-config,设置其值为false来禁用AutowiredAnnotationBeanPostProcessor和CommonAnnotationBeanPostProcessor的注册。
1.10.4. Using Filters to Customize Scanning
默认地,本身是用 @Component 注解的类,会被检测作为候选组件。但是也可以配置过滤器。
1.10.5. Defining Bean Metadata within Components
1.10.8. Providing Qualifier Metadata with Annotations
1.11. Using JSR 330 Standard Annotations
从 Spring 3.0 开始,Spring 为 JSR-330 标准注解(依赖注入)提供了支持。这些注解与 Spring 注解一样以相同的方式被扫描。要使用他们,你必须在类路径中持有相关的 jar 包。
如果你使用 maven,
javax.inject的 artifact 可以在标准 maven 仓库(https://repo1.maven.org/maven2/javax/inject/javax.inject/1/)直接获得。你可以将下面的依赖添加到 pom.xml:
2
3
4
5
<groupId>javax.inject</groupId>
<artifactId>javax.inject</artifactId>
<version>1</version>
</dependency>
1.11.1. Dependency Injection with @Inject and @Named
为了代替 @Autowired,你可以使用 @javax.inject.Inject,如下所示:
1 | import javax.inject.Inject; |
与 @Autowired 一样,你可以在字段级别,方法级别,构造函数级别内使用 @Inject。此外,你可以将注入点声明为一个 Provider,从而可以按需访问较短的范围或者通过调用 Provider.get() 来懒惰地访问其他 Bean。以下的示例提供了前面示例的变体:
1 | import javax.inject.Inject; |
如果你想使用注入依赖的限定名称,可以使用 @Named 注解,如下示例所示:
1 | import javax.inject.Inject; |
与 @Autowired 一样,@Inject 也可以与 java.util.Optional 或者 @Nullable 一起使用。在这里甚至更合适,因为 @Inject 没有 require 属性。以下一对示例展示了如何使用 @Inject 和 @Nullable:
1 | public class SimpleMovieLister { |
1.11.2. @Named and @ManagedBean: Standard Equivalents to the @Component Annotation
你可以使用 @javax.inject.Named 或者 @javax.annotation.ManagedBean 代替 @Component,如下示例所示:
1 | import javax.inject.Inject; |
使用 @Component 而不为组件指定名称非常常见。@Named 可以以类似的方式使用,如下示例所示:
1 | import javax.inject.Inject; |
当你使用 @Named 或者 @ManagedBean 时,你可以以与使用 Spring 注解时完全相同方式进行组件扫描,如下示例所示:
1 |
|
与
@Component相反,JSR-330@Named和 JSR-250@ManagedBean注解是不可组合的。你应该使用 Spring 的刻板印象模型来构建自定义的注解。
作者的话 之所以无法构建自定义的组合注解,是因为 Spring 不会去检查你的自定义注解。见
ClassPathScanningCandidateComponentProvider的includeFilters。
1.11.3. Limitations of JSR-330 Standard Annotations
当你使用标准注解时,你应该知道,有一些重要功能是不可用的,如下表所示:
| Spring | java.inject.* | javax.inject restrictions / comments |
|---|---|---|
| @Autowired | @Inject | @Inject 没有 required 属性。可以用 Java 8 的 Optional 替代 |
| @Component | @Named / @ManagedBean | JSR-330 未提供组合的模型,只是一种识别命名组件的方式 |
| @Scope(“singleton”) | @Singleton | JSR-330 默认范围就像 Spring 的 prototype。但是,为了使其与 Spring 的一般默认值保持一致,声明在 容器中的 JSR-330 Bean 默认是 singleton。为了使用 singleton 意外的范围,你应该使用 Spring 的 @Scope 注解。javax.inject 也提供了一个 @Scope 注解。然而,这仅仅用于创建你自己的注解。 |
| @Qualifier | @Qualifier / @Named | javax.inject.Qualifier 仅仅是一个用于构建自定义 qualifier 的元注解。可以通过 javax.inject.Named 关联具体的 String 限定词(就像 Spring 带有一个值的 @Qualifier) |
| @Value | - | 没有对等体 |
| @Required | - | 没有对等体 |
| @Lazy | - | 没有对等体 |
| ObjectFactory | Provider |
1.12. Java-based Container Configuration
1.12.1. Basic Concepts: @Bean and @Configuration
在 Spring 新的 Java 注解支持中的中央工件是 @Configuration 注解类以及 @Bean 注解方法。
@Bean 注解用于表明方法是实例化,配置和初始化一个由 Spring IoC 容器管理的新对象。对于那些熟悉 Spring <bean/> XML 配置的人,@Bean 注解扮演着与 <bean/> 元素相同的角色。
1.12.2. Instantiating the Spring Container by Using AnnotationConfigApplicationContext
AnnotationConfigApplicationContext 在
以下各节记录了 Spring 的 AnnotationConfigApplicationContext,在 Spring 3.0 引入。这种万能的 ApplicationContext 实现不仅能接收 @Configuration 类作为输入,而且能够接受 @Component 类以及 JSR-330 元数据注解的类。
当提供 @Configuration 类作为输入时,@Configuration 类本身被注册为 Bean Definition,并且在类中声明的所有 @Bean 方法也都会注册为 Bean Definition。
当 @Component 或者 JSR-330 注解的类作为输入时,它们会注册为 Bean Definition,并且在必要时,这些类中的依赖元数据,例如 @Autowired 或者 @Inject 都会被使用。
Simple Construction
与实例化 ClassPathXmlApplicationContext 时使用 Spring XML 文件作为输入的方式相同,当你实例化一个 AnnotationConfigApplicationContext 时,你可以使用 @Configuration 类作为输入。这是考虑到完全无 XML 的 Spring 容器的使用,如下示例所示:
1 | public static void main(String[] args) { |
如前面说的,AnnotationConfigApplicationContext 不仅限于与 @Configuration 类一起使用。任意 @Component 或者 JSR-330 注解类都可以作为输入提供给构造器,如下示例所示:
1 | public static void main(String[] args) { |
前面的示例假定 MyServiceImpl,Dependency1,以及 Dependency2 使用了 Spring 依赖注入注解,例如 @Autowired。
Building the Container Programmatically by Using register(Class<?>…)
你可以通过使用无参构造器实例化一个 AnnotationConfigApplicationContext,然后使用 register() 对其进行配置。当程序化地构建了一个 AnnotationConfigApplicationContext 这种方式特别有用。以下示例显示了如何做到:
1 | public static void main(String[] args) { |
Enabling Component Scanning with scan(String…)
要启用组件扫描,你可以按以下方式注解 @Configuration 类:
1 |
|
在前面的示例中,扫描 com.acme 包查找 @Component 注解的类,并且这些类以 Spring Bean Definition 的形式注册在容器中。AnnotationConfigApplicationContext 暴露了 scan(String...) 方法,以允许相同组件扫描功能,如下示例所示:
1 | public static void main(String[] args) { |
Support for Web Applications with AnnotationConfigWebApplicationContext
AnnotationConfigApplicationContext 的 WebApplicationContext 变体可用 AnnotationConfigWebApplicationContext。你在在配置 Spring ContextLoaderListener Servlet Listener,Spring MVC DispatcherServlet 等时候,使用此实现。下面的 web.xml 摘要配置了一个典型的 Spring MVC Web 应用(请注意 contextClass context-param 和 init-param 的使用):
1 | <web-app> |
1.12.3. Using the @Bean Annotation
@Bean 是一种方法级注解,是 <bean/> 元素的等价。注解支持一些 <bean/> 提供的属性,例如:*init-method destroy-method autowiring name.
你可以在 @Configuration 注解类或者 @Component 注解类中使用 @Bean 注解。
Declaring a Bean
要声明一个 Bean,你可以用使用 @Bean 注解一个方法。你可以使用此方法在 ApplicationContext 中注册一个 Bean Definition,其类型由方法返回值指定。默认地,Bean 名称与方法名称相同。以下示例展示了 @Bean 方法声明:
1 |
|
前面的配置完全等同于以下 Spring XML:
1 | <beans> |
这两种声明都使一个名为 transferService 的 bean 在 ApplicationContext 中可获得,绑定到类型为 TransferServiceImpl 的对象实例上,如下文本图形所示:
1 | transferService -> com.acme.TransferServiceImpl |
你也可以用接口(或者基类)返回值声明你的 @Bean 方法,如下示例所示:
1 |
|
但是,这将预先类型预测的可见性限制为指定的接口类型(TransferService)。然后,只有一次容器知道完全类型,被影响的单例已经被实例化。非懒惰单例 bean 根据其声明 order 初始化。因此,你可能看到不同类型的匹配结果,具体取决于其他组件试图通过非声明类型(例如 @Autowired TransferServiceImple,只有在实例化了 TransferService bean 之后才能解析)匹配。
Bean Aliasing
正如 Naming Beans 讨论的,有时候希望给一个 bean 多个名字,也成为 bean 别名。
如果希望给 bean 赋予多个名称,或者称之为别名,你可以向 @Bean 的 name 属性传递一个字符串数组。为此,@Bean 注解的 name 属性接受一个字符串数组。以下示例显示了如何为一个 bean 设置许多别名:
1 |
|
1.12.4. Using the @Configuration annotation
@Configuration 是一个类级别的注解,表明一个对象是 Bean Definition 的来源。@Configuration 类通过 public @Bean 注解方法声明 Bean。@Configuration 类上的 @Bean 方法的调用也可以用于定义 Bean 之间的依赖。
Injecting Inter-bean Dependencies
当 Bean 依赖于另一个 Bean 时,表现为依赖让一个 Bean 方法调用另一个一样简单,如下示例所示:
1 |
|
在前面的示例中,beanOne 通过构造器注入接收一个对 beanTwo 的引用。
仅当
@Bean方法声明在@Configuration类中时,这种声明 Bean 间依赖的方法才生效。你无法通过使用普通@Component类声明 Bean 间依赖。
Lookup Method Injection
如前所述,lookup method injection 是你比较少用的高级功能。在单例 Bean 依赖于原型 Bean 时这很有用。使用 Java 进行此类配置提供了一种天然的方式用于实现这种模式。下面的例子展示了如何查找方法注入:
1 | public abstract class CommandManager { |
通过使用 Java 配置,你可以创建一个 CommandManager 子类,其中抽象方法 createCommand() 被覆盖以查找一个新的(prototype)Command 对象。下面的示例展示了如何做到:
1 |
|
1.12.5. Composing Java-based Configurations
Spring 的基于 Java 的配置特色让你可以组合注解,从而降低配置的复杂度。
Using the @Import Annotation
就像在 Spring XML 文件中使用 <import/> 元素以帮助模块化配置,@Import 注解也允许你从另一个配置类加载 @Bean 定义,如下示例所示:
1 |
|
这种功能的引入旨在简化容器实例化,只用准备一个你需要的类,而不是记住所有的 @Configuration
自从 Spring Framework 4.2,
@Import也支持引用普通 Component 类。当你不希望组件扫描时,这是比较有用的,通过少数几个配置类作为入口点,从而定义你需要的组件。
@Import 支持以下几种用法:
- 导入普通 Bean
- 导入 ImportSelector 实现类
- 导入 ImportBeanDefinitionRegistrar 实现类
更多 @Import 用法参见 API
框架案例 MyBatis 的自动扫描 @Mapper 注入,@Import(AutoConfiguredMapperScannerRegistrar.class)
Conditionally Include @Configuration Classes or @Bean Methods
有条件地启用或禁用完整的 @Configuration 类,甚至单个 @Bean 方法。最常用的是使用 @Profile。
@Profile 注解实际上是通过更灵活的称之为 @Conditional 的注解实现。@Conditional 注解表示:特定的 org.springframework.context.annotation.Condition 实现应该在 @Bean 注册之前作为参考。
Condition 的接口实现提供了一个 matches(...) 方法,它返回 true 或者 false。
Combining Java and XML Configuration
Spring 的 @Configuration 类支持并不是为了完全取代 XML 配置。某些情况下,Spring XML 仍然是一种配置容器的理想方式。在 XML 比较方便或者必须使用的情况下,你可以选择:通过使用例如 ClassPathXmlApplicationContext 以 “XML为中心” 的方式实例化容器;或者以 “Java 为中心” 的方式实例化容器,使用 AnnotationConfigApplicationContext 以及 @ImportResource 注解导入所需的 XML
XML-centric Use of @Configuration Classes
也许最好的方式是从 XML 中引导 Spring 容器,并以点对点的方式包含 @Configuration 类。例如,在一个使用 Spring XML 的大型的现有代码库中,很容易在需要的基础上创建 @Configuration 类,并将他们从现存的 XML 文件中包含进去。稍后在本节中,我们会介绍这种 “以 XML 为中心” 情况下使用 @Configuration 类的选项。
Declaring @Configuration classes as plain Spring <bean/> elements
记住,@Configuration 类最终是容器中的 Bean Definition。在本系列示例中,我们创建了一个名为 AppConfig 的 @Configuration,并以一个 <bean/> 定义将其包含进 system-test-config.xml 中。因为 <context:annotaion-config/> 已经开启,容器会识别 @Configuration 注解并正确处理 AppConfig 中声明的 @Bean 方法。
以下示例展示了 Java 中一个普通的配置类:
1 |
|
以下示例展示了案例 system-test-config.xml 文件的部分:
`
1 | <beans> |
以下示例展示了可能的 jdbc.properties 文件:
1 | jdbc.url=jdbc:hsqldb:hsql://localhost/xdb |
1 | public static void main(String[] args) { |
Using <context:component-scan/> to pick up @Configuration classes
[@Configuration Class-centric Use of XML with @ImportResource]
在一些 @Configuration 类是配置容器的主要机制的应用中,仍然很可能有必要至少使用一些 XML。在这些情况下,你可以使用 @ImportResource,并按你所需定义 XML。这样做可以实现一种 “以 Java 为中心” 的方式配置容器,并将 XML 保持在最低限度。以下示例展示了如何使用 @ImportSource 注解来实现按需使用 XML 的 “以 Java 为中心” 的配置:
1 |
|
1 | properties-config.xml |
1 | jdbc.properties |
1 | public static void main(String[] args) { |
1.13. Environment Abstraction
Environment 接口是一个集成在容器中的抽象,它模型化了两个关键的应用程序环境方面:profiles 和 properties。
一个 profile 是一个有名的 Bean Definition 逻辑组,仅在给定的 profile 处于激活状态时,Bean Definition 才能注册到容器中。无论是以 XML 方式还是注解方式,bean 都可以分配给一个 profile。Environment 关于 profiles 的作用就是决定哪个 profile 当前是激活的,哪个 profiles 应该默认被激活。
属性在几乎所有应用程序都发挥着重要作用,并且可能来自各种源:属性文件,JVM 系统属性,系统环境变量,JNDI,Servlet 上下文参数,ad-hoc Properties 对象,Map 对象等。Environment 对象对于属性的作用就是提供用户一个方便的服务接口,用于配置属性源以及从中解析属性。
1.13.1. Bean Definition Profiles
Bean Definition profile 在核心容器中提供了一种机制,可以在不同环境中注册不同的 bean。”environment” 一词对于不同用户来说可能意味着不同的事物,该功能有助于许多用例,例如:
考虑在实际需要 DataSource 的应用的第一个用例。在测试环境中,配置可能类似于下面:
1 |
|
Using @Profile
@Profile 注解允许你指示当一个或多个指定 profile 激活时,一个组件才有资格注册。
@Profile 也可以在方法级别声明,这样仅包括了配置类的一个特定 bean。
XML Bean Definition Profiles
XML 对应的是 <bean/> 元素的 profile 属性。我们前面的示例配置可以以两个 XML 文件的方式重写,如下:
1 | <beans profile="development" |
1 | <beans profile="production" |
也可以避免拆分,并在同一个文件中嵌套 <beans/> 元素,如下示例所示:
1 | <beans xmlns="http://www.springframework.org/schema/beans" |
Activating a Profile
可以以多种方式激活 profile:
- Environment API 方式
- spring.profiles.active
最简单的是使用 ApplicationContext 的 Environment API 以编程方式激活:
1 | ctx.getEnvironment().setActiveProfiles("development"); |
还可以通过 spring.profiles.active 属性激活配置文件,可以通过系统环境变量,JVM 系统属性,web.xml 中的 servlet 上下文参数,甚至是在 JNDI 中的条目指定。spring.profiles.active 可以接受以逗号(,)分割的 profile 名称列表。
1 | -Dspring.profiles.active="profile1,profile2" |
Default Profile
默认的 profile 表示默认启用的 profile。考虑如下示例:
1 |
|
如果没有激活任何 profile,dataSource 会被创建。你可以将其视为为一个或多个 Bean 提供默认定义的一种方式。如果启用了任意 profile,默认的 profile 不再使用。
你可以通过在 Environment 上使用 setDefaultPrfiles() 或者声明式地使用 spring.profiles.default 来修改默认 profile 的名称。
1.13.2. PropertySource Abstraction
Spring 的 Environment 抽象在属性源的可配置层次结构上提供了搜索操作。考虑下面的代码清单:
1 | ApplicationContext ctx = new GenericApplicationContext(); |
在前面的片段中,我们看到了一种高级方法,其询问 Spring 是否为当前环境定义了 my-property 属性。为了回答这个问题,Environment 对象会对一组 PropertySource 对象执行搜索。PropertySource 是任何键值对源的简单抽象,并且 Spring 的 StandardEnvironment 配置了两个 PropertySource 对象 —— 一个代表 JVM 系统属性集(System.getProperties()),一个代表系统环境变量集(System.getenv())。
这些默认的属性源存在于
StandardEnvironment,用于独立应用。StandardServletEnvironment填充了其他默认的属性源,包括 Servlet Config 以及 Servlet Context 参数。它可以选择性的启用JndiPropertySource。详细信息参见 javadoc。
具体而言,当你使用 StandardEnvironment 时,如果在运行时具有 my-property 系统属性或者 my-property 环境变量,调用 env.containsProperty("my-property") 就会返回 true。
执行搜索是分层次的。默认地,系统属性优先于环境变量。因此,如果在调用
env.getProperty("my-property")期间my-property属性在两个地方都发生了赋值,系统属性值会”胜利”并返回。请注意,属性值并不会合并,而是完全被前面的条目覆盖。
对于通用的StandardServletEnvironment,完整的层次结构如下,优先级最高的在最顶端:
- ServletConfig 参数(如果适用,例如,在
DispatcherServlet上下文的情况下)- ServletContext 参数(web.xml 上下文参数条目)
- JNDI 环境变量(
java:comp/env/条目)- JVM 系统属性(
-D命令行参数)- JVM 系统环境(操作系统环境变量)
最重要的是,整个机制都是可配置的。也许你有一个自定义的属性源,要将其继承到此搜索中。为此,实现并实例化你自己的 PropertySource 并将其添加到当前 Environment 的 PropertySources 集合中。下面示例展示了怎么做:
1 | ConfigurableApplicationContext ctx = new GenericApplicationContext(); |
在前面的代码中,在搜索中以高优先级添加了 MyPropertySource。如果它包含 my-property 属性,属性会被检测并返回,支持其他任何 PropertySource 中的任何 my-property 属性。MutablePropertySources API 暴露了许多方法,这些方法允许精确地操纵属性源集合。
1.13.3. Using @PropertySource
@PropertySource 注解提供了一种便捷的声明式机制,用于将 PropertySource 添加到 Spring 的 Environment 中。
给定一个名为 app.properties 的文件,包含键值对 testbean.name=myTestBean,下面的 @Configuration 类使用 @PropertySource,以这种方式调用 testBean.getName() 返回 myTestBean:
1 |
|
出现在 @PropertySource 中的任何 ${...} 占位符都会用已经注册到 Environment 中的属性源集合进行解析,如下示例所示:
1 |
|
假定 my.placeholder 存在于已经注册的属性源之一(例如,系统属性或者环境变量)中,占位符会被解析为相关值。如果不存在,那么 default/path 会被作为默认值。如果未指定默认值,且属性无法解析,将会抛出 IllegalArgumentException。
1.13.4. Placeholder Resolution in Statements
过去,只针对 JVM 系统属性或者环境变量,元素上的占位符可以被解析。现在已不再这样。因为 Environment 抽象是集成在容器中的,因此很容易通过它来路由占位符的解析。这意味着你可以以任何你喜欢的方式配置解析流程。你可以通过系统属性或者环境变量更改搜索优先级,或者完全移除它们。你还可以适当地添加自己的属性资源。
具体而言,无论 customer 属性定义在哪儿,只要在 Environment 中可获得,下面的语句就可以工作:
1 | <beans> |
1.14. Registering a LoadTimeWeaver
Spring 使用 LoadTimeWeaver 当类加载到 Java 虚拟机时,动态转换这些类。
要启动加载时编织,你可以将 @EnableLoadTimeWeaving 添加到你的 @Configuration 类,如以下示例所示:
1 |
|
另外,对于 XML 配置,你可以使用 context:load-time-weaver 元素:
1 | <beans> |
一旦配置为 ApplicationContext,任何在该 ApplicationContext 中的 bean 都可以实现 LoadTimeWeaverAware,从而接收到加载时 weaver 示例的引用。
1.15. Additional Capabilities of the ApplicationContext
1.15.1. Internationalization using MessageSource
1.15.2. Standard and Custom Events
ApplicationContext 中的事件处理功能通过 ApplicationEvent 类以及 ApplicationListener 接口提供。如果一个实现了 ApplicationListener 接口的 bean 部署到上下文中,那么每次 ApplicationEvent 发布到 ApplicationContext 时,该 bean 会被通知。本质上,这是一种标准的观察者模式。
Spring 提供的标准事件:
ContextRefreshedEventContextStartedEventContextStoppedEventContextClosedEventRequestHandledEventServletRequestHandledEvent
Annotation-based Event Listeners
在一个 bean 的方法上通过使用 @EventListener 注解注册一个事件监听器。
方法签名声明事件监听的类型。事件的类型可以通过泛型参数缩小范围,只要实际事件类型在其实现架构中解析你的泛型参数。
如果方法应该监听多个事件,或者你不想定义参数,那么可以在注解上指定事件类型。
可以通过 condition 属性定义一个 SpEL 表达式来添加更多的运行时过滤效果。
Asynchronous Listeners
如果你希望异步地处理某个事件,那你可以使用常规的 @Async 注解。
Ordering Listeners
如果你需要在另一个监听器之前调用某个监听器,则你可以添加 @Order 注解至方法声明,如下示例所示:
1 |
|
Generic Events
你可以使用泛型来进一步定义事件的架构。例如,使用 EntityCreatedEvent<T>,其中 T 表示创建的实际实体类型。
1.16. The BeanFactory
BeanFactory API 为 Spring IoC 功能提供了基础。它的特定约定主要用于与 Spring 的其他部分以及第三方框架集成,并且它的 DefaultListableBeanFactory 实现是更高级别的 GenericApplicationContext 容器的委托。
BeanFactory 和相关接口(如 BeanFactoryAware, InitializingBean, DisposableBean)是其他框架的重要集成点。不需要任何注解或者反射,它们可以非常高效地在容器和组件之间通信。应用程序级别的 bean 可以使用相同的回调接口,但是通常会通过注解或者程序配置的方式进行声明式的依赖注入。
请注意,核心 BeanFactory API 级别和它的 DefaultLisableBeanFactory 实现都没有对配置格式或者任何待使用的组件注解做出规定。所有的风格都通过扩展(如:XmlBeanDefinitionReader 和 AutowiredAnnotationBeanPostProcessor)进行,并在共享的作为核心元数据表现形式的 BeanDefinition 对象上操作。这就是使 Spring 容器如此灵活且可扩展的本质。
1.16.1. BeanFactory or ApplicationContext?
在 ApplicationContext 中(如 GenericApplicationContext 实现),可以根据 bean name 或者 bean type(特别是后置处理器) 找到 bean,然而,普通的 DefaultListableBeanFactory 与任何特殊 bean 无关。
自从 SpringFramework 4.3,如果目标 bean 只定义了一个构造器,那么不再需要指定 @Autowired 注解,见4.3更新日志
2. Resources
2.1. Introduction
不幸地是,Java 标准的 java.net.URL 类和用于各种各样 URL 前缀的标准处理器不足以访问所有的低级资源。例如,没有标准化的 URL 实现可以用于访问需要从类路径或者相对于 ServletContext 的资源。虽然可以为特定的 URL 前缀注册新的处理器(类似于目前用于注入 http: 前缀的处理器),但这通常非常复杂,并且 URL 接口仍然缺乏一些理想的功能,例如检查被指向的资源存在性。
2.2. The Resource Interface
Spring 的 Resource 接口旨在成为一个用于抽象访问低级资源的更强大的接口。以下列举了 Resource 接口的定义:
1 | public interface Resource extends InputStreamSource { |
如 Resource 接口所示的定义,它扩展了 InputStreamSource 接口。以下列出了 InputStreamSource 接口的定义:
1 | public interface InputStreamSource { |
Resource 接口中一些最重要的方法是:
getInputStream(): 定位并打开资源,返回一个输入流以从资源中读取。预计每次调用都会返回新的输入流。调用者的职责就是关闭流。exists(): 返回一个boolean指示该资源是否真正以物理形式存在。isOpen(): 返回一个boolean标识该资源是否标识一个打开流的句柄。如果是true,则不能多次读取InputStream,并且必须仅读取一次,然后关闭避免资源泄露。除了InputStreamResource,所有常规资源实现都会返回false。getDescription(): 返回此资源的描述,用于使用资源时的错误输出。这通常是完全限定文件名或者资源的实际 URL。
其他方法可以让你获得代表资源的实际 URL 或者 File 对象(如果基础实现兼容且支持该功能)。
2.3. Built-in Resource Implementations
2.3.1. UrlResource
UrlResource 包装了 java.net.URL。可以用于访问通常用 URL 访问的任何对象,例如文件、HTTP 目标、FTP 目标等。所有 URL 都有标准化的字符串表现形式,因此使用适当的标准化前缀来指示一种 URL 类型。这包括 file: 用于访问文件系统路径, http: 用于访问通过 HTTP 协议的资源, ftp: 用于访问通过 FTP 的资源等。
UrlResource 由 Java 代码通过显式地使用 UrlResource 构造器创建,但是当你调用持有一个 String 参数标识路径的 API 方法时,通常会隐式地创建。对于后一种情况,Java Bean PropertyEditor 最终决定要创建哪种类型的资源。
2.3.2. ClassPathResource
2.3.3. FileSystemResource
这是用于 java.io.File 和 java.nio.file.Path 处理的 Resource 实现。它支持以 File 和 URL 方式解析。
2.3.5. InputStreamResource
2.4. The ResourceLoader
ResourceLoader 接口意味着由那些可以返回 Resource 实例的对象实现。下面的清单展示了 ResourceLoader 接口的定义:
1 | public interface ResourceLoader { |
所有 Application Context 都实现了 ResourceLoader 接口。因此,所有 Application Context 可以被用于获取 Resource 实例。
当你在特定应用上下文调用 getResource(),并且指定的位置路径没有特定前缀时,你将会获得适合特定 Application Context 的 Resource 类型。例如,假设以下代码段是针对 ClassPathXmlApplicationContext 实例运行的:
1 | Resource template = ctx.getResource("some/resource/path/myTemplate.txt"); |
对于 ClassPathXmlApplicationContext,该代码返回 ClassPathResource。如果相同的方法运行在 FileSystemXmlApplicationContext 实例上,将会返回 FileSystemResource。对于 WebApplicationContext,将会返回 ServletContextResource。类似地,将会返回适合于每个上下文的对象。
结果,你可以以适合于特定 Application Context 的方式加载资源。
下表总结了讲 String 对象转换为 Resource 对象的策略。
| Prefix | Example | Explanation |
|---|---|---|
| classpath: | classpath:com/myapp/config.xml |
从类路径加载 |
| file: | file:///data/config.xml |
从文件系统以 URL 加载 |
| http: | https://myserver/logo.png |
以 URL 加载 |
| (none) | /data/config.xml |
依赖于底层 ApplicationContext |
2.5. The ResourceLoaderAware interface
ResourceLoaderAware 接口是一个特殊的回调接口,它标识了那些期望提供以 ResourceLoader 接口的组件。下面的清单展示了 ResourceLoaderAware 接口的定义:
1 | public interface ResourceLoaderAware { |
2.7. Application Contexts and Resource Paths
本节涵盖了如何使用资源创建应用上下文,包括与 XML 工作的快捷方式,如何使用通配符,以及其他细节。
2.7.1. Constructing Application Contexts
ApplicationContext 的构造器通常将一个字符串或者字符串数组作为资源路径,例如构成上下文定义的 XML 文件。
当这样的路径没有前缀时,将会从该路径构建特定的 Resource 类型,并用于加载依赖及适配于特定 Application Context 的 Bean Definition。例如,考虑以下示例,该示例创建 ClassPathXmlApplicationContext:
1 | ApplicationContext ctx = new ClassPathXmlApplicationContext("conf/appContext.xml"); |
bean 定义将会从类路径加载,因为使用了 ClassPathResource。
1 | ApplicationContext ctx = new FileSystemXmlApplicationContext("conf/appContext.xml"); |
如果在路径上使用特殊的 classpath 前缀,或者标准的 URL 前缀,将会覆盖默认的 Resource 类型。
1 | ApplicationContext ctx = |
Constructing ClassPathXmlApplicationContext Instances — Shortcuts
ClassPathXmlApplicationContext 暴露出许多构造器,以便于实例化应用上下文。基本思想是:你可以只提供一个字符串数组,该数组包含 XML 文件名(无前导路径信息),并提供一个 Class。然后,ClassPathXmlApplicationContext 就能从提供的 Class 中推断出路径信息。
1 | public ClassPathXmlApplicationContext(String path, Class<?> clazz) throws BeansException { |
上述描述也就是根据当前类进行相对路径查找。
3. Validation, Data Binding, and Type Conversion
Spring Boot 2.3 不再包含 validation,见 github
将校验视为业务逻辑有利也有弊,Spring 提供了一种用于校验(以及数据绑定)的设计,这并不会排除其中任何一个。具体而言,验证不应该与 Web 层绑定,并且应该容易本地化,且应该有可能插入任何可用的验证器。考虑到这些问题,Spring 提供了一个 Validator 约定,它在每个应用层都是即基础又高度可用。
数据绑定对于让用户的输入动态绑定到应用程序的域模型(或者是任何拟用于处理用户输入的对象)非常有用。Spring 提供了恰当的名为 DataBinder 来做到这一点。Validator 和 DataBinder 组成了 validation 包,该包主要用于但不局限于 web 层。
BeanWrapper 是 Spring 框架中的一个基本概念,在许多地方都有使用。但是,你可能无需直接使用 BeanWrapper。但是,由于这是一个参考文档,所以我们认为需要进行一些解释。我们在本章解释 BeanWrapper,因为如果你要使用它,你很可能在尝试将数据绑定到对象上时这样做。
Spring 的 DataBinder 和低级 BeanWrapper 都使用 PropertyEditorSupport 实现类去解析和格式化属性值。PropertyEditor 和 PropertyEditorSupport 类型是 Java Bean 规范的一部分,也会在本章解释。
*** JavaBean 的校验
Java Bean 增加 @Valid 注解,或者 @Validated 注解。 @Validated 支持分组
1 | public HttpBody login( LoginVO loginVO) {} |
*** 普通参数校验
增加 @Valid 注解以及校验规则,同时 Controller 增加 @Validated 注解
1 |
|
3.1. Validation by Using Spring’s Validator Interface
Spring 提供了一个 Validator 接口,你可以用它来校验对象。Validator 接口通过使用 Errors 对象工作,以便在验证时,验证器可以将校验的失败报告给 Errors 对象。
考虑如下的一个小型数据对象示例:
1 | public class Person { |
接下来的示例通过实现 org.springframework.validation.Validator 接口的两个方法来为 Person 类提供验证行为:
supports(Class): 该Validator可以验证Class的实例吗?validate(Object, org.springframework.validation.Errors): 验证给定的对象,如果发生验证错误,使用给定的Errors对象进行注册。
实现 Validator 非常简单,尤其当你了解 Spring Framework 提供的 ValidationUtils 帮助类。以下示例为 Persion 示例实现了 Validator:
1 | public class PersonValidator implements Validator { |
ValidationUtils 类上的静态方法 rejectIfEmpty(..) 用于当 name 属性为 null 或者空字符串时进行拒绝。
虽然可以实现单个 Validator 类来验证复合对象中的每个嵌套对象,但最好将每个嵌套对象类的验证逻辑封装在其自己的 Validator 实现中。一个复合对象的简单例子是 Customer,其由两个 String 属性(first 和 second name)以及一个复杂对象 Address 组成。Address 对象可以独立于 Customer 对象使用,因此实现了一个独立的 AddressValidator。如果你希望你的 CustomerValidator 重用 AddressValidator 类中包含的逻辑,无需求助于复制粘贴,你可以在 CustomerValidator 中依赖注入或者实例化一个 AddressValidator,如下示例所示:
1 | public class CustomerValidator implements Validator { |
3.2. Resolving Codes to Error Messages
我们讨论了数据绑定和验证。本节涵盖了于验证错误相关的输出消息。在上一章节的示例中,我们拒绝 name 和 age 字段。如果我们想使用 MessageSource 输出错误消息,则我们可以使用拒绝字段时提供的错误码来完成。当你调用 rejectValue 或者来自 Errors 接口的其他 reject 方法之一时,底层实现不仅仅会注册你传递的错误码,而且会注册许多额外的错误码。MessageCodesResolver 决定了 Errors 接口注册哪些错误码。默认地,使用 DefaultMessageCodesResolver,它不仅仅注册你赋予的错误码的消息,而且还会注册包含你传递给拒绝方法的字段名的消息。因此,如果你通过使用 rejectValue("age", "too.darn.old")
3.3. Bean Manipulation and the BeanWrapper
org.springframework.beans 包遵循 Java Bean 标准。一个 Java Bean 是一个具有默认无参构造器,并且遵循命名约定的类,其中(举个例子)一个属性名为 bingoMadness 有一个 Setter 方法 setBingoMadness(..) 以及一个 Getter 方法 getBingoMadness()。有关 Java Bean 和规范的更多信息,参见 javabeans
在 bean 包中非常重要的类是 BeanWrapper 接口及其相应的实现(BeanWrapperImpl)。正如 Javadoc 引用的那样,BeanWrapper 提供了 set 和 get 属性值(单个或者批量)的功能,获取属性描述符和查询属性,以确定它们是可读还是可写的。此外,BeanWrapper 提供了对嵌套属性的支持,使子属性的属性设置为无限的深度。BeanWrapper 还提供了添加标准 Java Bean PropertyChangeListeners 以及 VetoableChangeListeners 的能力,无需在目标类中的代码支持。最后的但同样重要的是,BeanWrapper 提供了设置索引属性的支持。BeanWrapper 通常不直接使用应用程序代码,而是由 DataBinder 以及 BeanFactory 使用。
BeanWrapper 的工作方式见名知意:它包装 Bean 在该 Bean 上执行操作,例如设置和检索属性。
3.3.1. Setting and Getting Basic and Nested Properties
Set 和 Get 属性是通过 BeanWrapper 的重载方法变体 setPropertyValue 和 getPropertyValue 完成的。详细信息参见它们的 Javadoc。下表展示了这些约定的一些例子:
| Expression | Explanation |
|---|---|
name |
表示关联着 getName() 或者 isName() 以及 setName(..) 方法的属性 name |
account.name |
|
account[2] |
|
account[COMPANYNAME] |
以下两个示例类使用 BeanWrapper 去 Get 和 Set 属性:
1 | public class Company { |
1 | public class Employee { |
下面的代码片段展示了一些,关于如何检索和操纵实例化的 Companies 和 Employees 某些属性:
1 | BeanWrapper company = new BeanWrapperImpl(new Company()); |
3.4. Spring Type Conversion
3.7. Java Bean Validation
Spring Framework 为 Java Bean Validation API 提供了支持。
3.7.1. Overview of Bean Validation
Bean Validation 通过约束声明和 Java 应用的元数据提供了一种通用的验证方式。要使用它,你可以用声明式验证约束注解域模型,之后这些约束在运行时会被强制执行。有内置的约束,你也可以定义你自己的自定义约束。
考虑以下示例,该实例展示了一个具有两个属性的简单 PersonForm 模型:
1 | public class PersonForm { |
Bean Validation 让你可以声明约束,如下示例所示:
1 | public class PersonForm { |
然后,Bean Validation validator 基于声明的约束验证该类实例。
3.7.2. Configuring a Bean Validation Provider
Spring 为 Bean Validation API 提供了完全的支持,包括 Bean Validation provider 作为一个 Spring bean 的引导。这让你可以在你的应用任何需要验证的地方注入 javax.validation.ValidatorFactory 或者 javax.validation.Validator。
你可以使用 LocalValidatorFactoryBean 配置一个默认 Validator 作为 Spring Bean,如下示例所示:
1 | import org.springframework.validation.beanvalidation.LocalValidatorFactoryBean; |
Injecting a Validator
LocalValidatorFactoryBean 实现了 javax.validation.ValidatorFactory 和 javax.validation.Validator 以及 Spring 的 org.springframework.validation.Validator。你可以注入这些接口中的任何一个到你需要调用校验逻辑的 Bean 中。
如果你更喜欢直接使用 Bean Validation API,你可以注入 javax.validation.Validator 的引用,如下示例所示:
1 | import javax.validation.Validator; |
Configuring Custom Constraints
每个 Bean 验证约束由两部分组成:
@Constraint注解,声明了约束及其可配置的属性javax.validation.ConstraintValidator接口的实现类,实现了约束的行为
Spring-driven Method Validation
Additional Configuration Options
3.7.3. Configuring a DataBinder
4. Spring Expression Language (SpEL)
Spring 表达式语言(简称 SpEL)是一种功能强大的表达式语言,支持在运行时查询和操作对象图。该语言的语法类似于 Unified EL,但提供了额外的特性、最显著的方法调用和基本字符串模板功能。
虽然还有其他几种可用的 Java 表达式语言—— OGNL,MVEL,以及 JBoss EL,但仅举几个例子,创建 Spring 表达式语言是为了向 Spring 社区提供一种受良好支持的表达式语言,该语言可以在 Spring 产品组合中的所有产品中使用。它的语言特性是由 Spring 投资组合中的项目需求驱动的,包括在 Spring Tools For Eclipse 中队代码完成支持的工具需求。也就是说,SpEL 基于一种与技术无关的 API,它允许在需要时集成其他表达式语言实现。
5. Aspect Oriented Programming with Spring
面向切面编程(AOP)提供了另一种关于编程结构的思考方式,以对面向对象编程(OOP)进行补充。OOP 中关键的模块化单元是类,而 AOP 中,模块化单元是切面。切面使横跨多个类和对象切入的关注点(例如事务管理)模块化成为可能。(此类关注点通常在 AOP 的文献中称为“横切”关注点。)
Spring 的关键组件之一就是 AOP 框架。尽管 Spring IoC 容器不依赖于 AOP(意味着,如果你不想用,你就不必使用 AOP),但是 AOP 补充了 Spring IoC,提供了一个功能强大的中间件解决方案。
Spring AOP 和 AspectJ pointcuts
Spring 要不通过使用基于 schema 的方式,要不通过 `@AspectJ` 注解风格提供了简易且强大的写入自定义切点的方式。这两种方式都提供了完全的类型 Advice 并且 AspectJ 切点语言的使用同时也是用 Spring AOP 进行编织。 本章讨论了基于 schema 以及基于 @AspectJ 的 AOP 支持。下一章将讨论低级的 AOP 支持。
AOP 在 Spring Framework 中能做什么:
- 提供声明式企业服务。最重要的此类服务是声明式事务管理
- 让用户实现自定义切面,用 AOP 补充他们的 OOP
5.1. AOP Concepts
让我们通过定义一些核心 AOP 概念和术语开始。这些术语不是 Spring 特有的。不幸地是,AOP 术语不是特别直观。但是,如果 Spring 使用自己的术语,那将更加令人困惑。
- Aspect:切面,一个横跨多个类的模块化。事务管理是企业 Java 应用程序中横切问题很好的例子。在 Spring AOP 中,切面是通过使用常规类或者基于 @Aspect 注解的常规类。
- Join point:连接点,执行程序期间的一个点,可以是一个方法的执行或者一个异常的处理。在 Spring AOP 中,连接点就是代表一个方法的执行。
- Advice:通知,一个切面在特定连接点采取的行动。不同类似的通知包括 around,before,after。许多 AOP 框架,包括 Spring,将 advice 模型为一个拦截器,并在连接点周围维护一系列拦截器。
- Pointcut:切入点,匹配连接点的谓词。advice 与 pointcut 表达式关联,并且在切点匹配的任何 join point 执行。由 pointcut 表达式匹配的 join point 的概念是 AOP 的重点。默认,Spring 使用 AspectJ pointcut 表达式语言。
- Introduction(引入):代表一个类声明额外的方法或字段。Spring AOP 让你可以将新的接口(以及相关实现)引入任何通知对象。例如,你可以使用一个 introduction 使 Bean 实现一个
IsModified接口,以简化缓存。(一个 introduction 在 AspectJ 社区中称为类内声明) - Target object:由一个或多个切面通知的对象。
- AOP proxy:由 AOP 框架创建的对象,以实现切面约定(通知方法执行等)。在 Spring 框架中,AOP 代理可以是 JDK 动态代理或者是 CGLIB 代理。
- Weaving:将切面与其他应用类或对象链接,以创建一个通知对象。这可以在编译时(例如。使用 AspectJ 编译器),加载时,或者运行时完成。像其他纯 Java AOP 框架一样,Spring AOP 在运行时进行编织。
Spring AOP 包括下面通知类型:
- Before advice
- After returning advice
- After throwing advice
- After (finally) advice
- Around advice
5.3. AOP Proxies
Spring AOP 默认使用标准 JDK 动态代理作为 AOP 代理。这使得可以代理任何接口(或者一组接口)。
Spring AOP 也可以使用 CGLIB 代理,这对于代理一些类而非接口是很有必要的。默认地,如果业务对象没有实现接口,则使用 CGLIB。由于最好的实践是面向接口编程而非面向类编程,业务类通常实现一个或多个业务接口。当你需要通知一个未声明在任何接口的方法时,或者需要将代理对象作为固定类型传递给一个方法时,可以强制使用 CGLIB。
5.4. @AspectJ support
5.4.1. Enabling @AspectJ Support
5.4.2. Declaring an Aspect
启用 @AspectJ 支持之后,应用上下文定义的任何 bean 与 @Aspect 注解的类是由 Spring 自动检测,并用于配置 Spring AOP。
与其他任何类相同,切面(使用 @Aspect 注解的类)可以拥有方法和字段。他们也可以包含切入点,通知,和介绍声明。
5.4.3. Declaring a Pointcut
切入点可以确定感兴趣的连接点,从而让我们控制通知的运行时机。Spring AOP 仅仅支持方法 Spring bean 的方法执行连接点,因此你可以考虑 Spring bean 上的方法执行匹配的切入点。
切入点的声明有两个部分:
- 签名,包括名称和任何参数
- 切点表达式,精确指定哪些方法的执行是我们所感兴趣的
在 @AspectJ 注解风格的 AOP 中,切入点的签名由常规的方法定义提供,切入表达式由 @Pointcut 注解表示。
构成 @Pointcut 注解值的切入点表达式时常规的 AspectJ 5 切入点表达式。
Supported Pointcut Designators
Spring AOP 支持以下 AspectJ 切入点指示符用于切入点表达式:
execution:用于匹配方法执行连接点。within:thistargetargs@target@args@within@annotation
Spring AOP 还支持一个名为 bean 的 PCD。该 PCD 允许你将连接点的匹配限定为特定名称的 Spring bean 或者一组名称的 Spring bean(使用通配符)。
Combining Pointcut Expressions
你可以通过 &&, ||, ! 来组合切入点表达式。你也可以按名称引用切入点表达式。
1 |
|
5.4.4. Declaring Advice
通知和切入点表达式有关,然后在切入点匹配的方法 before,after 或者 around 执行。
Before Advice
1 |
|
After Returning Advice
当匹配的方法执行正常返回时,After returning advice 将会执行。
有时候,你需要在通知体里面访问实际的返回值。你可以使用 @AfterReturning 绑定返回值,如下:
1 |
|
属性 returning 中的名称必须与通知方法的参数名称相匹配。当方法执行返回时,返回值会传递给通知方法中相关的参数。returning 还限制只能匹配那些特定类型的返回值(本例中,Object 匹配任何返回值)
After Throwing Advice
当匹配的方法以抛出异常的方式结束时,after throwing advice 会运行。
通常,你希望仅当给定类型的异常抛出时,运行某个通知,而且你也需要在通知体中访问该异常。你可以使用 throwing 属性进行限制匹配,并且绑定抛出的异常到通知参数。
1 |
|
属性 throwing 中的名称必须与通知方法的参数名称相匹配。当方法是因为抛出异常而结束时,异常会传递给通知方法中相关的参数。throwing 也可以限制仅仅匹配方法执行过程中特定的异常(比如这里的 DataAccessException)。
After (Finally) Advice
当匹配的方法执行退出时,After(finally) advice 会运行。通过 @After 注解声明。必须准备号 After 通知以处理正常和异常的返回条件。通常,它用于释放资源等。
注意 @AfterThrowing 并不表示通用的异常处理。@AfterThrowing 通知方法仅仅应该从连接点接收异常,而不是从伴随的
@After/@AfterReturning方法。
Around Advice
环绕通知围绕着被匹配方法的执行。在方法执行前后,它均有机会工作,并确定何时,如何,甚至是否方法实际上是否要运行。如果你需要以线程安全的方式(例如,启动和停止计时器)在方法执行前后共享状态,通常需要时候 Around 通知。
官方建议 总是使用功能最小的通知形式来满足需求,即,如果需要前置通知,那么就不用使用环绕通知。
环绕通知使用 @Around 注解声明。通知方法的第一个参数必须是 ProceedingJoinPoint。在通知体里,调用 ProceedingJoinPoint.proceed() 方法会引起底层方法的运行。proceed 方法还可以传递一个 Object[]。数组中的值将作为执行方法时的参数。
用
Object[]调用proceed()的行为与被 AspectJ 编译器编译的环绕通知的proceed()行为有点不同。对于使用传统 AspectJ 语言编写的环绕通知,传递给proceed的参数数量必须与传递给环绕通知的参数数量匹配,并且,在给定参数位置传递给proceed的值会取代在连接点处绑定到实体上的原始值。Spring 采取的方法更简单,更好地匹配基于代理的,仅仅执行语义。如果你编译为 Spring 所写的 @AspectJ 切面,并且与 AspectJ 编译器和 Weaver 一起使用preceed携带的参数,你只需要意识到这种差异。
环绕通知的返回值就是方法调用者可见的返回值,其他调用者并不会感知。例如,实现一个简单的缓存切面,如果存在缓存那么就从缓存中得到并返回值,如果不存在就调用 proceed()。
注意 可以在 Around 通知体中调用一次,多次,或者不调用 proceed() 方法。这些都是合法的。
Access to the Current JoinPoint
任何的通知方法都可以声明 org.aspectj.lang.JoinPoint 类型参数,作为它的第一个参数。
注意 Around 通知需要声明第一个参数为 ProceedingJoinPoint,它时 JoinPoint 的子类。
JoinPoint 接口提供了许多有用的方法:
getArgs():Object[]:返回方法参数getThis():Object:返回代理对象getTarget():Object:返回目标对象getSignature():Signature:返回被通知方法的描述toString():String:打印被通知方法的有用描述
若你觉得我的文章对你有帮助,欢迎点击上方按钮对我打赏
扫描二维码,分享此文章